
In recent days, skin cancer is seen as one of the most Hazardous form of Cancers found in Humans. Skin cancer is found in various types such as Melanoma, Basal and Squamous cell Carcinoma among which Melanoma is the most unpredictable. The detection of Melanoma cancer in the early stage can be helpful to cure it. Computer vision can play important role in Medical Image Diagnosis and it has been proved by many existing systems.

In ths blog we using python and Kotlin language for making a complete abdriod application.


We’ll use TFLite to create an end-to-end Android application for this project. We decided to create an Android app that can detect skin cancer diseases.
For downlad the complete project Please click on download button at the end of this blog.
The project mainly is divided into two parts:
- TensorFlow and Keras are used to build and create a machine learning model.
- TFLite is used to deploy the model to an Android application.
Tensorflow with Keras Deep Learning model
Using Convolutional Neural Networks, we developed algorithms and models to distinguish between benign and malignant skin cancers. For source code editing, we utilise Colab.
Source Code for Training CNN model
import tensorflow as tf
import tensorflow_hub as hub
import os
from keras.models import Sequential
from tensorflow.keras.layers import Dense
from tensorflow.keras.layers import Flatten
from tensorflow.keras.layers import Conv2D
from tensorflow.keras.layers import Dropout
from tensorflow.keras import Model
from tensorflow.keras.preprocessing.image import ImageDataGenerator
from tensorflow.keras.optimizers import Adam
from tensorflow.keras import layers
Loading the data:
Load the dataset. For this, you can use your own custom dataset. In this blog, we are going to use the skin cancer dataset binary classification benign vs malignant. After that we need to label.
train_dir='/content/drive/MyDrive/Buffml/code/Training/Dataset'
Labels = ['Benign', 'Malignant']
print ("class : ")
for i in range(len(Labels)):
    print (i, end = " ")
    print (Labels[i])
print('Number of classes:',len(Labels))
Transfer Learning with TensorFlow hub:
Select the Hub/TF2 module to use, you have a choice with inception v3 or Mobilenet.In the blog we are using MobileNet model.
module_selection = ("mobilenet_v2", 224, 1280)
handle_base, pixels, FV_SIZE = module_selection
MODULE_HANDLE ="https://tfhub.dev/google/tf2-preview/{}/feature_vector/2".format(handle_base)
IMAGE_SIZE = (pixels, pixels)
BATCH_SIZE = 16
Data Preprocessing:
Set up data generators to read images from our source folders, transform them to float32 tensors, and feed them to our network (along with their labels). As you may be aware, data that is fed into neural networks is normally normalised in some way to make it easier for the network to process.
In our situation, we’ll preprocess our images by converting the pixel values to the [0, 1] range (all values are now in the [0, 255] range). The input data must be scaled to 224×224 pixels as an input, as specified by the networks. You can choose whether or not to use image augmentation.
train_datagen = tf.keras.preprocessing.image.ImageDataGenerator(
      rescale = 1./255,
      rotation_range=40,
      horizontal_flip=True,
      width_shift_range=0.2,
      height_shift_range=0.2,
      shear_range=0.2,
      zoom_range=0.2,
      fill_mode='nearest',
      validation_split=0.3)

train_generator = train_datagen.flow_from_directory(
    train_dir,
    subset="training",
    shuffle=True,
    seed=42,
    color_mode="rgb",
    class_mode="categorical",
    target_size=IMAGE_SIZE,
    batch_size=BATCH_SIZE)

validation_generator = train_datagen.flow_from_directory(
    train_dir,
    shuffle=False,
    seed=42,
    color_mode="rgb",
    class_mode="categorical",
    subset="validation",
    target_size=IMAGE_SIZE,
    batch_size=BATCH_SIZE)
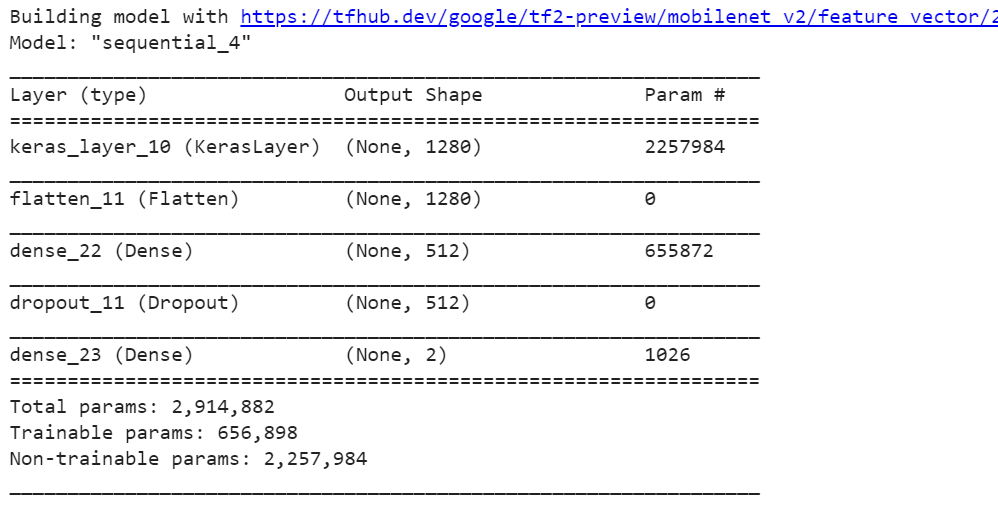
Build the model:
It’s as simple as using the Hub module to layer a linear classifier on top of the feature extractor. We start with a non-trainable feature extractor for speed, but you may enable fine-tuning for more accuracy, although training the model takes a long time.
feature_extractor = hub.KerasLayer(MODULE_HANDLE,input_shape=IMAGE_SIZE+(3,), output_shape=[FV_SIZE])
do_fine_tuning = False
if do_fine_tuning:
  feature_extractor.trainable = True
  for layer in base_model.layers[-30:]:
    layer.trainable =True

else:
  feature_extractor.trainable = False

print("Building model with", MODULE_HANDLE)
model = tf.keras.Sequential([
    feature_extractor,
    tf.keras.layers.Flatten(),
    tf.keras.layers.Dense(512, activation='relu'),
    tf.keras.layers.Dropout(rate=0.2),
    tf.keras.layers.Dense(train_generator.num_classes, activation='softmax',
                           kernel_regularizer=tf.keras.regularizers.l2(0.0001))
])

model.summary()
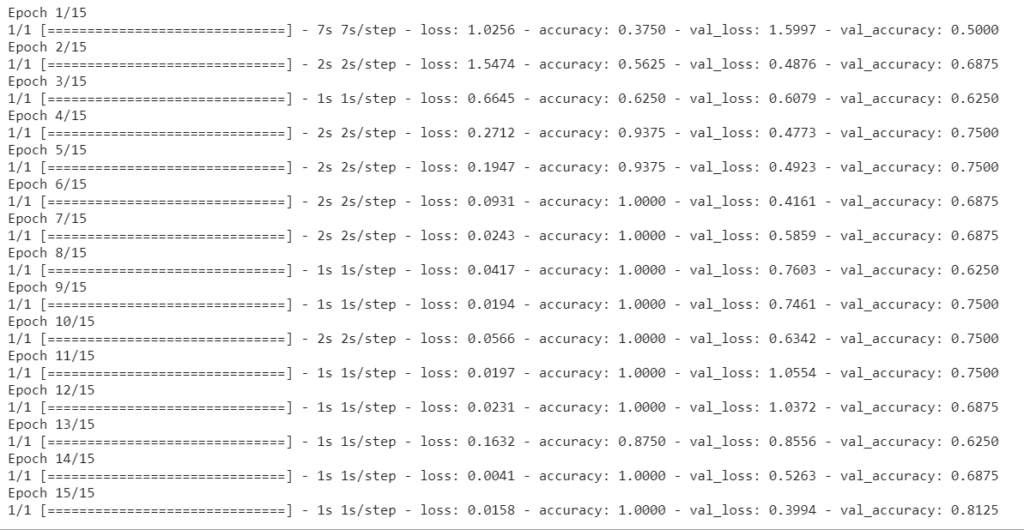
Training Model:
Validate each step by training the model with the validation dataset. We achieve 81% accuracy after 15 epochs, but fine-tuning can increase this to more.
LEARNING_RATE = 0.001
model.compile(
   optimizer=tf.keras.optimizers.Adam(learning_rate=LEARNING_RATE),
   loss='categorical_crossentropy',
   metrics=['accuracy'])
EPOCHS=15
history = model.fit(
        train_generator,
        steps_per_epoch=train_generator.samples//train_generator.batch_size,
        epochs=EPOCHS,
        validation_data=validation_generator,
        validation_steps=validation_generator.samples//validation_generator.batch_size)
Checking Performance:
Plot training and validation, accuracy and loss
import matplotlib.pylab as plt
import numpy as np

acc = history.history['accuracy']
val_acc = history.history['val_accuracy']

loss = history.history['loss']
val_loss = history.history['val_loss']

epochs_range = range(EPOCHS)

plt.figure(figsize=(10, 4))
plt.subplot(1, 2, 1)
plt.plot(epochs_range, acc, label='Training Accuracy')
plt.plot(epochs_range, val_acc, label='Validation Accuracy')
plt.legend(loc='lower right')
plt.title('Training and Validation Accuracy')
plt.ylabel("Accuracy (training and validation)")
plt.xlabel("Training Steps")

plt.subplot(1, 2, 2)
plt.plot(epochs_range, loss, label='Training Loss')
plt.plot(epochs_range, val_loss, label='Validation Loss')
plt.legend(loc='upper right')
plt.title('Training and Validation Loss')
plt.ylabel("Loss (training and validation)")
plt.xlabel("Training Steps")
plt.show()

Test at random:
Pick five images at random from the validation dataset and make the following prediction:
import random
import cv2
def upload(filename):
    img = cv2.imread(os.path.join(train_dir, filename))
    img = cv2.resize(img, (224, 224) )
    img = img /255
    return img

def pre_result(image):
    x = model.predict(np.asarray([img]))[0]
    classx = np.argmax(x)
    return {Labels[classx]: x[classx]}
images = random.sample(validation_generator.filenames, 16)

for idx, filename in enumerate(images):
    img = upload(filename)
    prediction = pre_result(img)
    print("class: %s, confidence: %f" % (list(prediction.keys())[0], list(prediction.values())[0]))
    plt.imshow(img)
    plt.figure(idx)
    plt.show()


Note: If you adjust a few hyperparameters, the model will improve. You might want to try a different pre-trained model. It’s entirely up to you.
Confusion Matrix
import pandas as pd
import numpy as np
import seaborn as sn
print('Confusion Matrix')
cm = confusion_matrix(validation_generator.classes, y)
df = pd.DataFrame(cm, columns=validation_generator.class_indices)
plt.figure(figsize=(10,7))
sn.heatmap(df, annot=True)

Export as saved model and convert to TFLite:
import time
t = time.time()
export_path = "/tmp/saved_models/{}".format(int(t))
tf.keras.models.save_model(model, export_path)
export_path
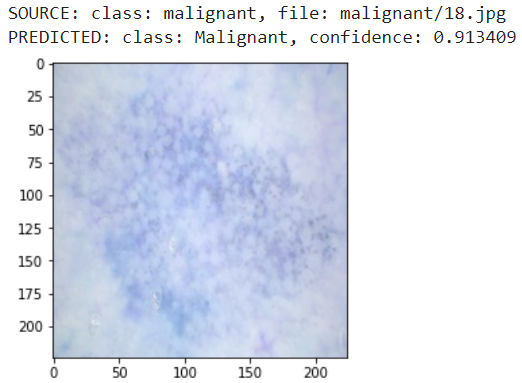
# Now confirm that we can reload it, and it still gives the same results
reloaded = tf.keras.models.load_model(export_path, custom_objects={'KerasLayer':hub.KerasLayer})
def predict_reload(image):
    probabilities = reloaded.predict(np.asarray([img]))[0]
    class_idx = np.argmax(probabilities)
    return {Labels[class_idx]: probabilities[class_idx]}
for idx, filename in enumerate(random.sample(validation_generator.filenames, 2)):
    print("SOURCE: class: %s, file: %s" % (os.path.split(filename)[0], filename))
    img = upload(filename)
    prediction = predict_reload(img)
    print("PREDICTED: class: %s, confidence: %f" % (list(prediction.keys())[0], list(prediction.values())[0]))
    plt.imshow(img)
    plt.figure(idx)
    plt.show()

# convert the model to TFLite
!mkdir "tflite_models"
TFLITE_MODEL = "tflite_models/model.tflite"

# Get the concrete function from the Keras model.
run_model = tf.function(lambda x : reloaded(x))

# Save the concrete function.
concrete_func = run_model.get_concrete_function(
    tf.TensorSpec(model.inputs[0].shape, model.inputs[0].dtype)
)
# Convert the model to standard TensorFlow Lite model
converter = tf.lite.TFLiteConverter.from_concrete_functions([concrete_func])
converted_tflite_model = converter.convert()
open(TFLITE_MODEL, "wb").write(converted_tflite_model)
Android App Part
We’ll use TFLite to build an end-to-end Android application for this project. We decided to create an Android app that detects skin cancer.
Add TFLite model in our Android Project
First — load the model in our Android project, we put model.tflite and labels.txt into assets/ directory. model.tflite is the result of our previous colab notebook. We need to add TFLite dependency to app/build.gradle file.
implementation 'org.tensorflow:tensorflow-lite:1.14.0'
Don’t forget to include the following snippet to prevent the model from being compressed.
aaptOptions {
    noCompress "tflite"
}
Lets Further Discuss the Code:
To load our model and read the labelled file, create a classifier:
class Classifier(assetManager: AssetManager, modelPath: String, labelPath: String, inputSize: Int) {
    private var INTERPRETER: Interpreter
    private var LABEL_LIST: List<String>
    private val INPUT_SIZE: Int = inputSize
    private val PIXEL_SIZE: Int = 3
    private val IMAGE_MEAN = 0
    private val IMAGE_STD = 255.0f
    private val MAX_RESULTS = 3
    private val THRESHOLD = 0.4f

    data class Recognition(
        var id: String = "",
        var title: String = "",
        var confidence: Float = 0F
    )  {
        override fun toString(): String {
            return "Title = $title, Confidence = $confidence)"
        }
    }

    init {
        INTERPRETER = Interpreter(loadModelFile(assetManager, modelPath))
        LABEL_LIST = loadLabelList(assetManager, labelPath)
    }

    private fun loadModelFile(assetManager: AssetManager, modelPath: String): MappedByteBuffer {
        val fileDescriptor = assetManager.openFd(modelPath)
        val inputStream = FileInputStream(fileDescriptor.fileDescriptor)
        val fileChannel = inputStream.channel
        val startOffset = fileDescriptor.startOffset
        val declaredLength = fileDescriptor.declaredLength
        return fileChannel.map(FileChannel.MapMode.READ_ONLY, startOffset, declaredLength)
    }

    private fun loadLabelList(assetManager: AssetManager, labelPath: String): List<String> {
        return assetManager.open(labelPath).bufferedReader().useLines { it.toList() }

    }

    fun recognizeImage(bitmap: Bitmap): List<Classifier.Recognition> {
        val scaledBitmap = Bitmap.createScaledBitmap(bitmap, INPUT_SIZE, INPUT_SIZE, false)
        val byteBuffer = convertBitmapToByteBuffer(scaledBitmap)
        val result = Array(1) { FloatArray(LABEL_LIST.size) }
        INTERPRETER.run(byteBuffer, result)
        return getSortedResult(result)
    }


    private fun convertBitmapToByteBuffer(bitmap: Bitmap): ByteBuffer {
        val byteBuffer = ByteBuffer.allocateDirect(4 * INPUT_SIZE * INPUT_SIZE * PIXEL_SIZE)
        byteBuffer.order(ByteOrder.nativeOrder())
        val intValues = IntArray(INPUT_SIZE * INPUT_SIZE)

        bitmap.getPixels(intValues, 0, bitmap.width, 0, 0, bitmap.width, bitmap.height)
        var pixel = 0
        for (i in 0 until INPUT_SIZE) {
            for (j in 0 until INPUT_SIZE) {
                val `val` = intValues[pixel++]

                byteBuffer.putFloat((((`val`.shr(16)  and 0xFF) - IMAGE_MEAN) / IMAGE_STD))
                byteBuffer.putFloat((((`val`.shr(8) and 0xFF) - IMAGE_MEAN) / IMAGE_STD))
                byteBuffer.putFloat((((`val` and 0xFF) - IMAGE_MEAN) / IMAGE_STD))
            }
        }
        return byteBuffer
    }


    private fun getSortedResult(labelProbArray: Array<FloatArray>): List<Classifier.Recognition> {
        Log.d("Classifier", "List Size:(%d, %d, %d)".format(labelProbArray.size,labelProbArray[0].size,LABEL_LIST.size))

        val pq = PriorityQueue(
            MAX_RESULTS,
            Comparator<Classifier.Recognition> {
                    (_, _, confidence1), (_, _, confidence2)
                -> java.lang.Float.compare(confidence1, confidence2) * -1
            })

        for (i in LABEL_LIST.indices) {
            val confidence = labelProbArray[0][i]
            if (confidence >= THRESHOLD) {
                pq.add(Classifier.Recognition("" + i,
                    if (LABEL_LIST.size > i) LABEL_LIST[i] else "Unknown", confidence)
                )
            }
        }
        Log.d("Classifier", "pqsize:(%d)".format(pq.size))

        val recognitions = ArrayList<Classifier.Recognition>()
        val recognitionsSize = Math.min(pq.size, MAX_RESULTS)
        for (i in 0 until recognitionsSize) {
            recognitions.add(pq.poll())
        }
        return recognitions
    }

}
Where Recognition is our result data class :
data class Recognition(
        var id: String = "",
        var title: String = "",
        var confidence: Float = 0F
    )  {
        override fun toString(): String {
            return "Title = $title, Confidence = $confidence)"
        }
    }
When we have an instance of Interpreter, we need to convert the preprocessed bitmap into ByteBuffer then we create a method that will take an image as an argument and return a list of labels with assigned probabilities to them:
fun recognizeImage(bitmap: Bitmap): List<Classifier.Recognition> {
        val scaledBitmap = Bitmap.createScaledBitmap(bitmap, INPUT_SIZE, INPUT_SIZE, false)
        val byteBuffer = convertBitmapToByteBuffer(scaledBitmap)
        val result = Array(1) { FloatArray(LABEL_LIST.size) }
        INTERPRETER.run(byteBuffer, result)
        return getSortedResult(result)
    }
Here’s how we convert a bitmap into ByteBuffer:
private fun convertBitmapToByteBuffer(bitmap: Bitmap): ByteBuffer {
        val byteBuffer = ByteBuffer.allocateDirect(4 * INPUT_SIZE * INPUT_SIZE * PIXEL_SIZE)
        byteBuffer.order(ByteOrder.nativeOrder())
        val intValues = IntArray(INPUT_SIZE * INPUT_SIZE)

        bitmap.getPixels(intValues, 0, bitmap.width, 0, 0, bitmap.width, bitmap.height)
        var pixel = 0
        for (i in 0 until INPUT_SIZE) {
            for (j in 0 until INPUT_SIZE) {
                val `val` = intValues[pixel++]

                byteBuffer.putFloat((((`val`.shr(16)  and 0xFF) - IMAGE_MEAN) / IMAGE_STD))
                byteBuffer.putFloat((((`val`.shr(8) and 0xFF) - IMAGE_MEAN) / IMAGE_STD))
                byteBuffer.putFloat((((`val` and 0xFF) - IMAGE_MEAN) / IMAGE_STD))
            }
        }
        return byteBuffer
    }
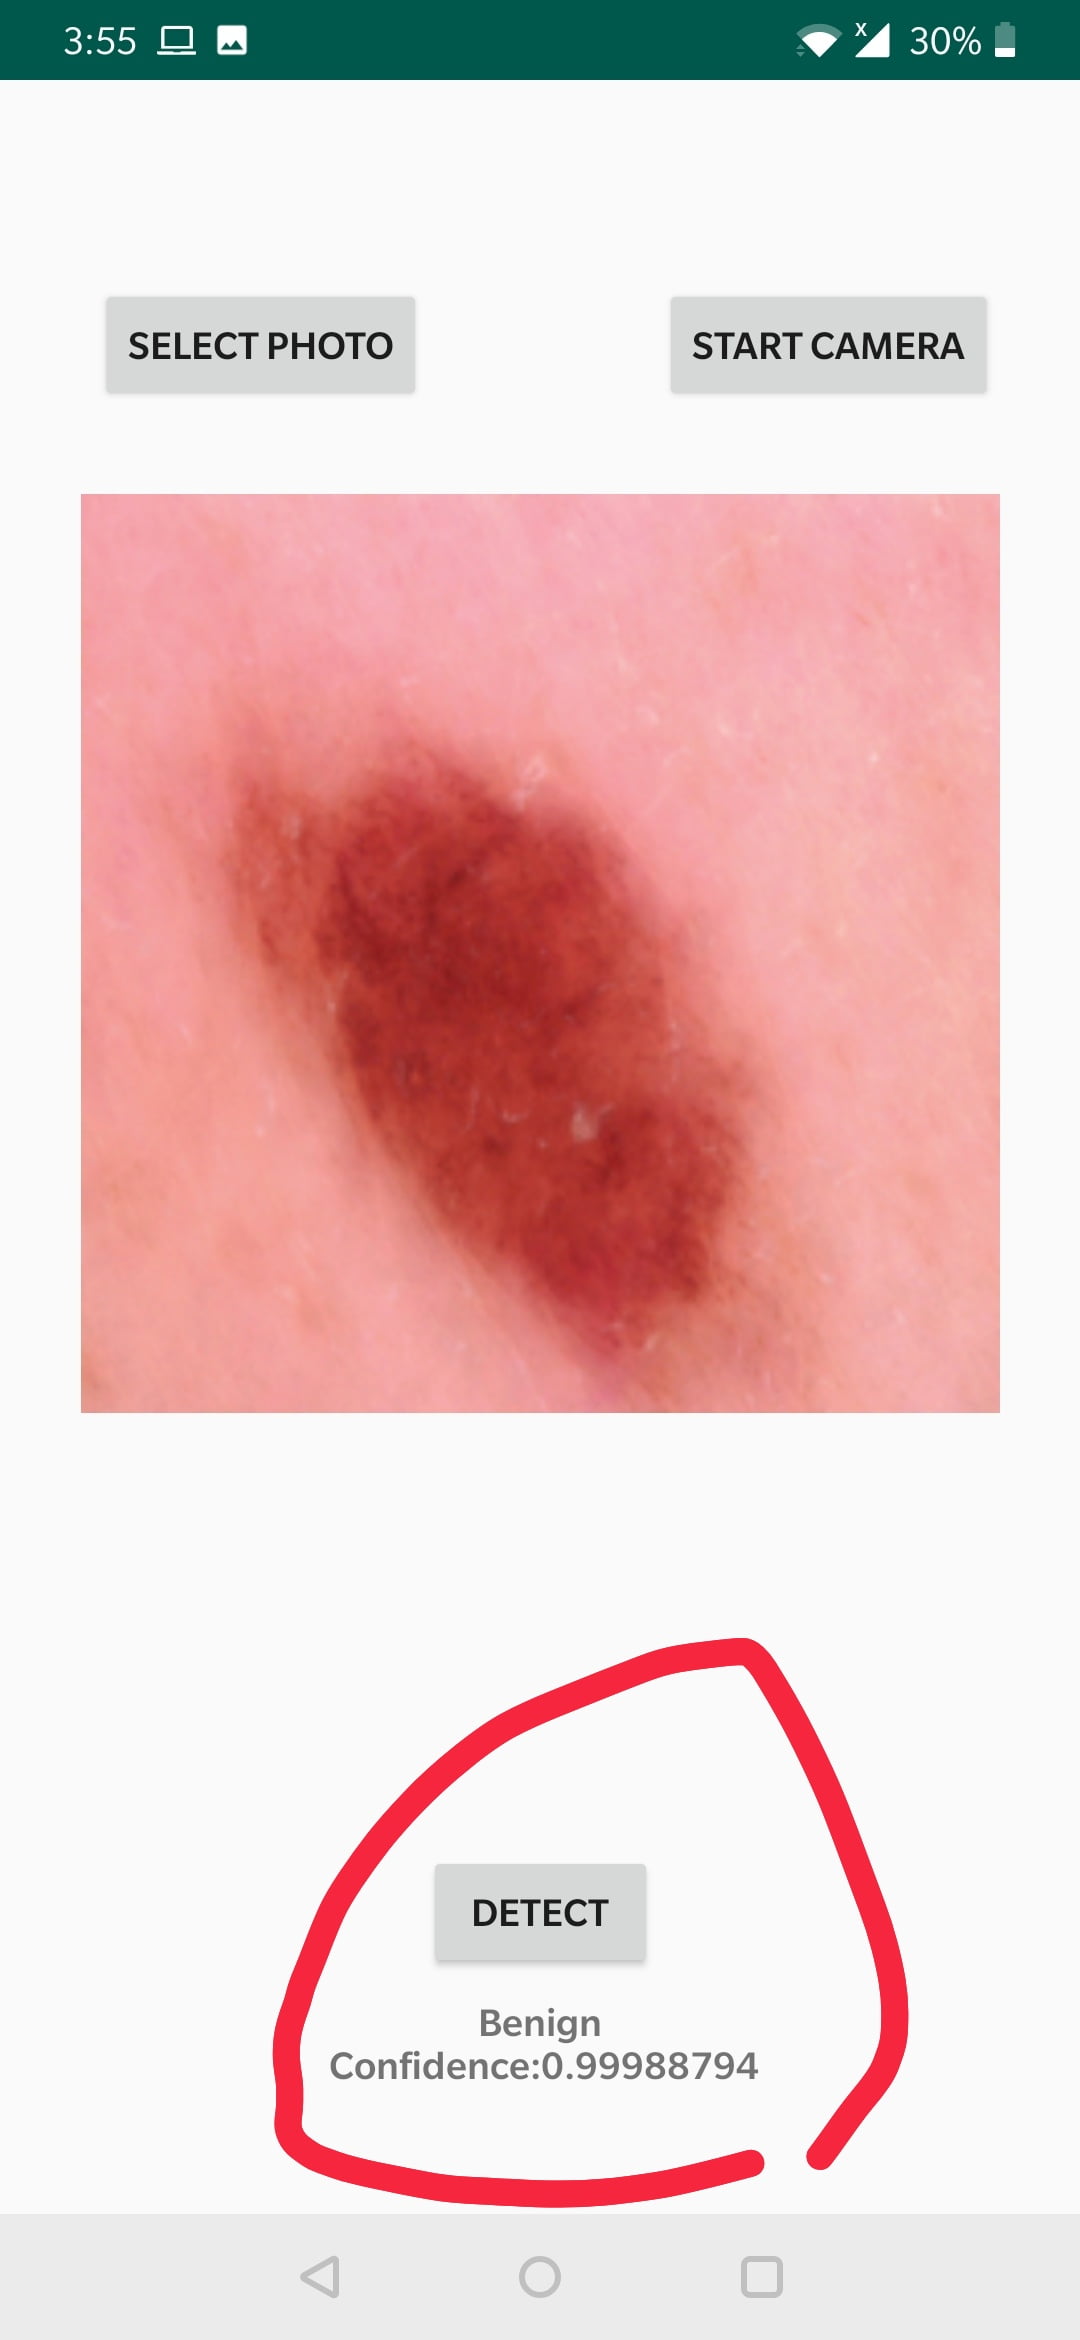
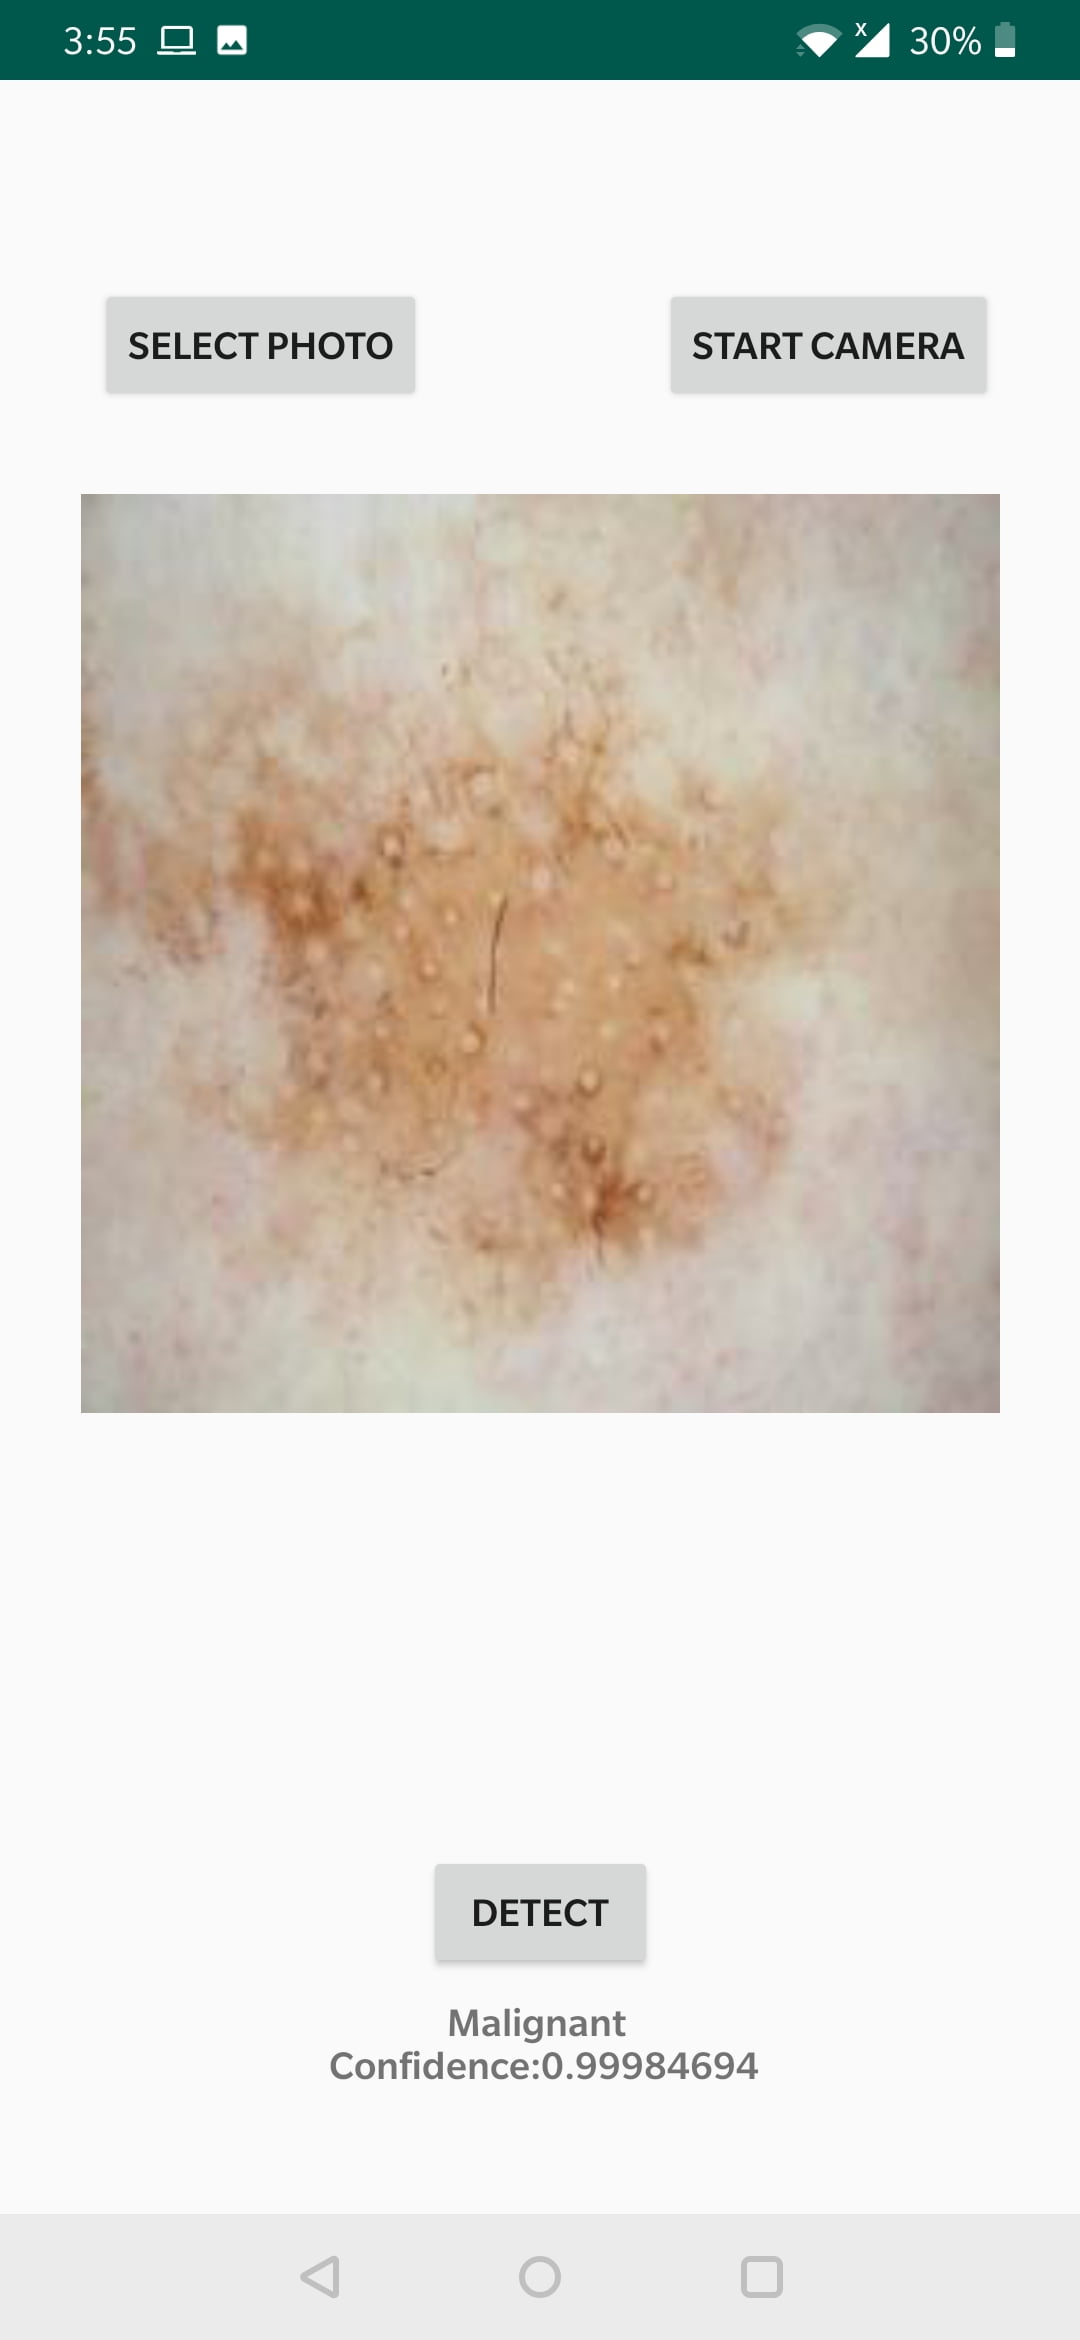
The out look of our app:
Here is most of the MainActivity code, we’ll use in our app:
class MainActivity : AppCompatActivity() {
    private lateinit var mClassifier: Classifier
    private lateinit var mBitmap: Bitmap
    private val mCameraRequestCode = 0
    private val mGalleryRequestCode = 2
    private val mInputSize = 224
    private val mModelPath = "model.tflite"
    private val mLabelPath = "labels.txt"
    private val mSamplePath = "skin-icon.jpg"

    @RequiresApi(Build.VERSION_CODES.O)
    override fun onCreate(savedInstanceState: Bundle?) {
        super.onCreate(savedInstanceState)
        requestedOrientation = ActivityInfo.SCREEN_ORIENTATION_PORTRAIT
        setContentView(R.layout.activity_main)
        mClassifier = Classifier(assets, mModelPath, mLabelPath, mInputSize)

        resources.assets.open(mSamplePath).use {
            mBitmap = BitmapFactory.decodeStream(it)
            mBitmap = Bitmap.createScaledBitmap(mBitmap, mInputSize, mInputSize, true)
            mPhotoImageView.setImageBitmap(mBitmap)
        }

        mCameraButton.setOnClickListener {
            val callCameraIntent = Intent(MediaStore.ACTION_IMAGE_CAPTURE)
            startActivityForResult(callCameraIntent, mCameraRequestCode)
        }

        mGalleryButton.setOnClickListener {
            val callGalleryIntent = Intent(Intent.ACTION_PICK)
            callGalleryIntent.type = "image/*"
            startActivityForResult(callGalleryIntent, mGalleryRequestCode)
        }
        mDetectButton.setOnClickListener {
                val results = mClassifier.recognizeImage(mBitmap).firstOrNull()
                mResultTextView.text= results?.title+"\n Confidence:"+results?.confidence
        }
    }

    override fun onActivityResult(requestCode: Int, resultCode: Int, data: Intent?) {
        if(requestCode == mCameraRequestCode){
            //Considérons le cas de la caméra annulée
            if(resultCode == Activity.RESULT_OK && data != null) {
                mBitmap = data.extras!!.get("data") as Bitmap
                mBitmap = scaleImage(mBitmap)
                val toast = Toast.makeText(this, ("Image crop to: w= ${mBitmap.width} h= ${mBitmap.height}"), Toast.LENGTH_LONG)
                toast.setGravity(Gravity.BOTTOM, 0, 20)
                toast.show()
                mPhotoImageView.setImageBitmap(mBitmap)
                mResultTextView.text= "Your photo image set now."
            } else {
                Toast.makeText(this, "Camera cancel..", Toast.LENGTH_LONG).show()
            }
        } else if(requestCode == mGalleryRequestCode) {
            if (data != null) {
                val uri = data.data

                try {
                    mBitmap = MediaStore.Images.Media.getBitmap(this.contentResolver, uri)
                } catch (e: IOException) {
                    e.printStackTrace()
                }

                println("Success!!!")
                mBitmap = scaleImage(mBitmap)
                mPhotoImageView.setImageBitmap(mBitmap)

            }
        } else {
            Toast.makeText(this, "Unrecognized request code", Toast.LENGTH_LONG).show()

        }
    }
    fun scaleImage(bitmap: Bitmap?): Bitmap {
        val orignalWidth = bitmap!!.width
        val originalHeight = bitmap.height
        val scaleWidth = mInputSize.toFloat() / orignalWidth
        val scaleHeight = mInputSize.toFloat() / originalHeight
        val matrix = Matrix()
        matrix.postScale(scaleWidth, scaleHeight)
        return Bitmap.createBitmap(bitmap, 0, 0, orignalWidth, originalHeight, matrix, true)
    }
}
Where scaleImagemethod allows us to resize the image because our model expects the exact input shape (224x224 pixels), therefore we need to rescale a delivered bitmap to fit into these constraints:
fun scaleImage(bitmap: Bitmap?): Bitmap {
        val orignalWidth = bitmap!!.width
        val originalHeight = bitmap.height
        val scaleWidth = mInputSize.toFloat() / orignalWidth
        val scaleHeight = mInputSize.toFloat() / originalHeight
        val matrix = Matrix()
        matrix.postScale(scaleWidth, scaleHeight)
        return Bitmap.createBitmap(bitmap, 0, 0, orignalWidth, originalHeight, matrix, true)
    }
Final outpot of the apps:

Download Complete Project:
Hi! can I get the code for androis studios xml file and main app